 webCOMAND Docs
 Developer Guide
Event Registration Web App
In this tutorial, we will create a web app to list upcoming events and allow users to sign up, sign in, register for events and update their registrations.
webCOMAND Features
The web app will leverage the following webCOMAND features.
- Packages - Group our code and content, and write Files to the file system.
- Content Types - Store and manage events and registrations.
- Users Framework - Handle user sign up, sign in, forgot password, etc.
- cMVC Framework - Build event listing, registration and update functionality.
- Web Framework - Process web form submissions and visitor sessions.
- Route Settings - Route web requests for a custom domain to our web app.
Create a Package
 Like most webCOMAND web app projects, we will first create a Package to group our content and code.
- Launch the Content Manager (CMS) app.
- Select a folder to create the package under.
- Click the new menu (
 ) and select "Package".
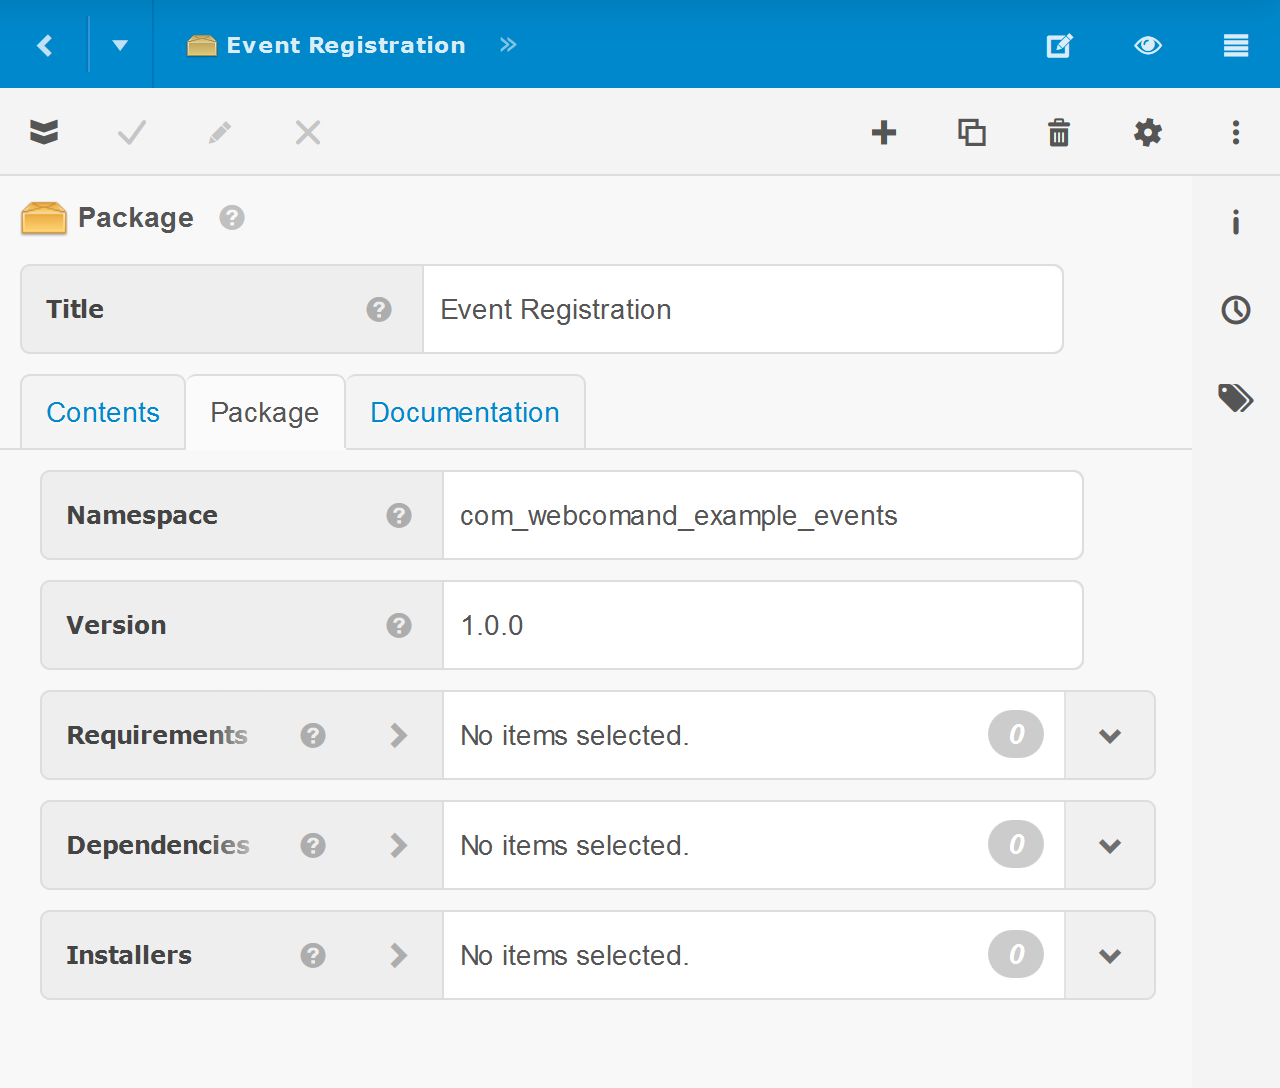
 - Fill in information about our new Package:
- Title: Event Registration
- Namespace (under Package tab): com_webcomand_example_events
- Click Approve
Create an "Event" Content Type
Create a Content Type to define events that will listed for users to review and register for.
- Under the Contents tab, click the new menu () and select "Content Type".
- Enter "Event" for the Title of our new Content Type.
- Click Fields to the left.
- Click add (
 ) to the right to open the Field Chooser.
 - Click and drag "Date" from the Field Chooser and drop it in the blank form area just to the left.
- In the right sidebar, enter "Date" for the new field Title.
- Repeat steps 4-6 for the following additional fields:
- Time > "Start Time"
- Time > "End Time"
- Text Line > "Title"
- Rich Text Box > "Description"
- Click Approve and Back.
Create an "Event User" Content Type
Create a content type to store event registration user information.
- In the Collection Toolbar, click the new menu () and select "Content Type".
- Enter "Event User" for the Title of our new Content Type.
- Select "User" in the Extends drop-down to inherit fields from that Content Type, which will allow us to more easily leverage the webCOMAND Login framework.
- Click Approve and Back.
Create an "Event Registration" Content Type
Create a content type to store user registration information that will be submitted from a web form.
- In the Collection Toolbar, , click the new menu () and select "Content Type".
- Enter "Event Registration" for the Title of our new Content Type.
- Select "Web Form Base" in the Extends drop-down to inherit fields from that Content Type, which will be used to store the Submit Time, IP Address, User Agent, Submit URL and Web Form for each submission. This will also help integrate Event Registrations into the Forms App.
- Click Fields to the left.
- Event - Add a field that will reference the Event of the registration.
- Click add () to the right to open the Field Chooser.
- Search for "Event" in the Field Chooser and expand "References" if needed.
- Drag and drop "Event" after the last field in the form to the left.
- In the right sidebar, enter "Event" for the new field Title.
- Click add (
- User - Add a field that will reference the Event User of the registration.
- Click add () to the right to open the Field Chooser.
- Search for "User" in the Field Chooser and expand "References" if needed.
- Drag and drop "User" after the last field in the form to the left.
- In the right sidebar, enter "User" for the new field Title.
- Click add (
- Notes - Add a field to store registration notes from the user.
- Click add () to the right to open the Field Chooser.
- Clear the search input at the top.
- Drag and drop "Text Box" after the last field in the form to the left.
- In the right sidebar, enter "Notes" for the new field Title.
- Click add (
- Click Approve and Back.
Create a few test Events
Create a few test events, so there is something to see as we develop the web app.
- In the Collection Toolbar, click the new menu () and select "Event".
- Fill in test information for an event coming up about a week out.
- Click Approve and Back.
Repeat the steps above for additional test events.
Create a Login Policy
We are almost ready to start coding, but when we do, we will want to leverage the Users Framework to help handle user logins and related features. In order to do that, we need to define a Login Policy to associate with our Event Users. There are a lot of options to customize the login process and related features, but we will stick with the defaults to keep it simple. With that in mind, rather than create a Login Policy from scratch, we will simply copy and tweak the built-in webCOMAND Login Policy.
- In the folder tree on the left, expand and click:
System / Packages / webCOMAND / Login Policy - Hover over "webCOMAND Login Policy" and click Copy (
 ).
). - Click Back to return to our package.
- Click Paste (
 ) in the Contents field, then Approve up top.
 - Open the copied "webCOMAND Login Policy" and update the fields:
- Identifier: EventUsers
- Title: Event Users
- System Title: Event Registration
- Administrator Title: <your name>
- Administrator Email: <your email>
- Administrator Phone: <your phone>
- Administrator Hours: <your hours of operation>
- Click Approve and Back.
Code the web app
Now that we have the content types, some test events and a Login Policy, we can start coding. We will use the cMVC Framework and follow the MVC architecture pattern, which will make it easier to manage and extend our code.
Create a cMVC Router
We will create a router to receive and route requests to the controllers we will create next.
- In the Collection Toolbar, click the new menu () and select "cMVC Router".
- Enter the Filename:
index.php - Enter the code:
<?php namespace com_webcomand_example_events; require_once('/var/www/webcomand/comand.php'); \io_comand_mvc\router::route([ 'namespace' => __NAMESPACE__, 'default' => 'events' ]); - Click Approve and Back.
Create a Base cMVC Controller
Before we create the two main controllers for our web app, we will first create a "base controller" for some common functionality that the two main controllers will inherit.
- In the Collection Toolbar, click the new menu () and select "cMVC Controller".
- Enter the Filename:
base_controller.php - Enter the code:
<?php namespace com_webcomand_example_events; /** * To be extended by controllers that use session/user info. */ class base_controller extends \io_comand_mvc\controller { protected $session = NULL; protected $user = NULL; public function __construct(array $options = []) { parent::__construct($options); $this->session = new \io_comand_web\session(); $this->session->load(); if(isset($this->session->user_oid)) { $this->user = $this->repo()->get_object($this->session->user_oid, 'EventUser'); } } /** * Override default controller view method with our own that automatically * combines variables we make available to all views, along with any custom * vars and then wraps the resulting view in our standard layout. */ public function view($name, array $vars = [], $return = FALSE) { $content = parent::view( $name, array_merge([ 'base_url' => $this->base_url, 'user' => $this->user ], $vars), TRUE ); if($return) { return $content; } return parent::view('layout', [ 'base_url'=> $this->base_url, 'user' => $this->user, 'content' => $content ]); } public function get_package() { return $this->repo()->get_first('FROM Package WHERE Namespace="com_webcomand_example_events"'); } } - Click Approve and Back.
Create a User cMVC Controller
Next we will add user login functionality, which will leverage the User Framework and Login Policy created earlier.
- In the Collection Toolbar, click the new menu () and select "cMVC Controller".
- Enter the Filename:
controllers/user.php - Enter the code:
<?php namespace com_webcomand_example_events\controllers; class user extends \com_webcomand_example_events\base_controller { public function web__signup() { if($this->user) { $this->show_error('You are already signed in. Before you sign up for a new account, please <a href="' . $this->base_url . 'user/signout">sign out</a>.'); } $message = ''; $action = $this->request->post('action'); $email = $this->request->post('email'); if($action == 'Sign Up') { $message = $this->signup($email); if(!$message) { return $this->view('message', [ 'title' => 'Email Sent', 'message' => 'Please check your email for a link to finish your account set up.' ]); } } return $this->view('form', [ 'url' => 'user/signup', 'title' => 'Sign Up', 'message' => $message, 'fields' => [ ['title' => 'Email', 'name' => 'email', 'autofocus' => TRUE] ], 'action' => 'Sign Up' ]); } private function signup($email) { if(!filter_var($email, FILTER_VALIDATE_EMAIL)) { return 'Invalid email address. Please try again.'; } $login_policy = $this->get_login_policy(); // see if there is already an Event User with that email address $user = $this->repo()->get_first("FROM EventUser WHERE Email=?",['bind'=>[$email]]); if($user) { return 'Sorry, that email address is already registered. To access that account, use forgot password.'; } $user = $this->repo()->new_object('EventUser'); if(!$user) { return 'Sorry, could not create new user. No Event User content type.'; } $user->Folders[] = $this->get_package(); $user->Username = $email; $user->Email = $email; $user->Active = TRUE; $success = $user->approve(); if(!$success) { return 'Sorry, could not create new user. Could not add event user.'; } $login_policy->Users[] = $user; $success = $login_policy->approve(); if(!$success) { return 'Sorry, could not create new user. Could not update login policy.'; } // send a welcome email $login = new \io_comand_login\login($login_policy); try { $protocol = (isset($_SERVER['HTTPS']) && $_SERVER['HTTPS'] != 'off' ? 'https://' : 'http://'); $login->set('account', $user->OID); $login->set('link', $protocol . $this->request->server('HTTP_HOST') . $this->base_url . 'user/reset'); $login->reset->welcome(); if(!$login->get('user')) { return "Unable to send welcome email. Unrecognized user."; } } catch( \io_comand\exception $e ) { return "Unable to send welcome email. " . $e->getMessage() . ""; } $this->user = $user; return ''; } private function view_set_password($title, $code, $note, $message) { return $this->view('form', [ 'url' => 'user/reset', 'title' => $title, 'form_title' => 'Set Password', 'form_text' => 'Enter a new password and then enter it again to confirm.', 'note' => $note, 'message' => $message, 'fields' => [ ['type' => 'hidden', 'name' => 'code', 'value' => $code], ['title' => 'Password', 'type' => 'password', 'name' => 'new_password', 'autofocus' => TRUE], ['title' => 'Confirm', 'type' => 'password', 'name' => 'confirm_password'] ], 'action' => 'Set Password' ]); } public function web__reset() { $title = 'Account Set Up'; $code = $this->request->request('code'); if(!$code) { return $this->view('message', [ 'title' => $title, 'message' => 'No reset code.' ]); } $login_policy = $this->get_login_policy(); $note = ($login_policy->Credentials ? $login_policy->Credentials->StrengthDescription : ''); $action = $this->request->post('action'); $new_password = $this->request->post('new_password'); $confirm_password = $this->request->post('confirm_password'); if(!$new_password || !$confirm_password) { $message = ($action == 'Set Password' ? 'An identical password must be entered in both inputs.' : ''); return $this->view_set_password($title, $code, $note, $message); } $login = new \io_comand_login\login($login_policy); try { $protocol = (isset($_SERVER['HTTPS']) && $_SERVER['HTTPS'] != 'off' ? 'https://' : 'http://'); $login->set('account', $code); $login->set('new_password', $new_password); $login->set('confirm_password', $confirm_password); $login->reset->reset_password(); $user = $login->get('user'); if(!$user) { return $this->view_set_password($title, $code, $note, 'Unable to set password. Unknown error.'); } } catch( \io_comand\exception $e ) { return $this->view_set_password($title, $code, $note, 'Unable to set password. ' . $e->getMessage()); } // login the user $this->session->user_oid = $user->OID; $this->session->save(); $this->user = $user; return $this->view('message', [ 'title' => $title, 'message' => 'Password has been set. You are now logged in.' ]); } public function web__signin() { $action = $this->request->post('action'); $username = $this->request->post('username'); $password = $this->request->post('password'); $message = ''; if($action == 'Sign In' && $username && $password) { // get the login policy and try to login $login_policy = $this->get_login_policy(); try { $login = new \io_comand_login\login($login_policy, $this->repo()); $login->set('account', $username); $login->set('password', $password); $this->user = $login->login->login(); } catch(\io_comand_login\exception $e) { $this->user = NULL; $message = $e->getMessage(); } } elseif($action == 'Sign In') { $message = 'Username and password required.'; } // if login was successful (or user is already logged in), redirect to main page if($this->user) { $this->session->user_oid = $this->user->OID; $this->session->save(); header('Location: ' . $this->base_url); return; } // display sign in form return $this->view('form', [ 'url'=> 'user/signin', 'title'=> 'Sign In', 'message' => $message, 'fields' => [ ['title' => 'Email', 'name' => 'username', 'autofocus' => TRUE], ['title' => 'Password', 'type' => 'password', 'name' => 'password'] ], 'link' => ['text' => 'Forgot Password', 'url' => 'user/forgot'], 'action' => 'Sign In' ]); } public function web__forgot() { $title = 'Forgot Password'; $login_policy = $this->get_login_policy(); $action = $this->request->post('action'); $email = $this->request->post('email'); if(!$email) { return $this->view('form', [ 'url' => 'user/forgot', 'title' => 'Forgot Password', 'form_text' => 'Enter the email address associated with your account.', 'message' => ($action == 'Send Email' ? 'You must enter an email address.' : ''), 'fields' => [ ['title' => 'Email', 'name' => 'email', 'autofocus'=> TRUE] ], 'action' => 'Send Email' ]); } $login = new \io_comand_login\login($login_policy); try { $protocol = (isset($_SERVER['HTTPS']) && $_SERVER['HTTPS'] != 'off' ? 'https://' : 'http://'); $login->set('account', $email); $login->set('link', $protocol . $this->request->server('HTTP_HOST') . $this->base_url . 'user/reset'); $login->reset->forgot_password(); $user = $login->get('user'); if(!$user) { return $this->view('message', [ 'title' => $title, 'message' => 'Email could not be sent. Unknown error. (user=' . $user . ')' ]); } } catch( \io_comand\exception $e ) { return $this->view('message', [ 'title' => $title, 'message' => 'Email could not be sent. ' . $e->getMessage() ]); } return $this->view('message', [ 'title' => $title, 'message' => 'Email sent. Please open and click link to reset your password.' ]); } public function web__signout() { $this->session->user_oid = NULL; $this->session->save(); header('Location: ' . $this->base_url); } private function get_login_policy() { $login_policy = $this->repo()->get_first('FROM LoginPolicy WHERE Identifier="EventUsers"'); if(!$login_policy) { $this->show_error("No login policy."); } return $login_policy; } } - Click Approve and Back.
Create an Events cMVC Controller
Next we will create a controller, which will handle requests to display events and register users.
- In the Collection Toolbar, click the new menu () and select "cMVC Controller".
- Enter the Filename:
controllers/events.php - Enter the code:
<?php namespace com_webcomand_example_events\controllers; class events extends \com_webcomand_example_events\base_controller { /** * Display upcoming events. */ public function web__index() { // wrap the events list in the web page layout return $this->view_event_list(); } /** * Display the details and registration form for an event. */ public function web__details($oid) { $event = $this->get_event($oid); $reg = $this->get_registration($event); return $this->view('details', [ 'event' => $event, 'reg' => $reg ]); } /** * Process a event details form POST request. */ public function web__register() { $event_oid = $this->request->post('OID'); $event = $this->get_event($event_oid); $log = new \io_comand_log\log(); $reg = NULL; $success = FALSE; if($this->user) { $action = $this->request->post('action'); // get existing or new Event Registration and update from form $reg = $this->get_registration($event); if($action == 'Unregister' && $reg) { $success = $reg->delete(); } else { if(!$reg) { $reg = $this->repo()->new_object('EventRegistration'); $reg->Folders[] = $this->get_package(); $reg->Event = $event; $reg->User = $this->user; $reg->SubmitTime = \io_comand_util\time::get_timestamp(); $reg->IPAddress = $this->request->server('REMOTE_ADDR'); $reg->UserAgent = $this->request->server('HTTP_USER_AGENT'); $reg->SubmitURL = $this->request->server('HTTP_REFERER'); } $success = $this->request->update($reg, [ 'include' => ['Notes'], 'write' => 'approve', 'log' => $log ]); } } else { $log->log_error('You must login to register.'); } // if there were errors, display details again if($success) { return $this->view_event_list(); } return $this->view('details', [ 'message' => ($log->count()>0 ? $log->as_html() : 'Unknown error.'), 'event' => $event, 'reg' => $reg ]); } /** * Retreive an event based on the OID and ensure it is an Event * object. */ private function view_event_list() { // get events dated today until 2 weeks out $query = $this->repo()->query() ->select("OID, Date, StartTime, EndTime, Title, Description") ->from("Event") ->where("Date>=NOW() AND Date<=DATE_ADD(NOW(), INTERVAL 2 WEEK)") ->order_by("Date, StartTime, EndTime"); // if the user is known, also select the user's registration // for each event. if($this->user) { // Event Registrations that reference the Event and User $query->select('@(Event)EventRegistration.User.OID=' . $this->user->OID . ' AS Reg'); } // get and format the events as an HTML list $events = $query->get(); return $this->view('list', [ 'events' => $events ]); } /** * Retreive an event based on the OID and ensure it is an Event object. */ private function get_event($oid) { $event = $this->repo()->get_object($oid, 'Event'); if(!$event) { $this->show_error("Invalid event ($oid) specified."); } return $event; } private function get_registration($event) { if(!$this->user){ return NULL; } return $this->repo()->query() ->from("EventRegistration") ->where("User.OID=" . $this->user->OID) ->where("Event.OID=" . $event->OID) ->get_first(); } } - Click Approve and Back.
Create CSS
Next, we will create a simple CSS file to define some styles for our web app.
- In the Collection Toolbar, click the new menu () and select "CSS File".
- Enter the Filename:
public/css/web.css - Enter the code:
body { margin: 0; font-family: Arial, sans-serif; } h1, h2, h3, a { color: #09d; } header, section { padding: 2px 32px; } header { position: relative; background-color: #09d; color: #fff; } header a { color: #fff; text-decoration: none; } header a:hover { background-color: #0ae; } header .profile { position: absolute; top: 50%; right: 32px; transform: translateY(-50%); } .event-list { padding: 0; list-style: none; } .event-list li { position: relative; padding: 0; } .event-list li.registered .title::after { content: "registered"; display: inline-block; vertical-align: middle; margin: 0 0 2px 8px; border-radius: 4px; padding: 4px 6px; background-color: #09d; font-size: 9px; color: #fff; } .event-list a { display: block; padding: 16px 12px; color: #444; text-decoration: none; } .event-list a:hover { background-color: #eee; } .event-list .title { font-size: 18px; font-weight: bold; } .date, .time { color: #666; } form { display: inline-block; border: 1px solid #ccc; padding: 28px 24px; background-color: #f4f4f4; } form h3 { margin-top: 0; } form .message { margin: 16px 0; border: 1px solid #f00; border-radius: 4px; padding: 12px 10px; background-color: #fee; color: #f00; } form .note { margin: 16px 0; border: 1px solid #09d; border-radius: 4px; padding: 12px 10px; background-color: #e8f4ff; color: #09d; } form .field label { display: block; margin: 24px 0 4px; font-weight: bold; color: #666; } form .field input, form .field textarea { width: 320px; border: 1px solid #ddd; padding: 12px 8px; font-size: 18px; } form .field input:focus, form .field textarea:focus { border: 1px solid #09d; background-color: #e8f4ff; } form .actions { margin: 24px 0 0; } form .actions input { border: 1px solid #09d; padding: 12px 16px; background-color: #09d; font-size: 18px; color: #fff; cursor: pointer; } form .actions input:hover { background-color: #fff; color: #09d; } form .actions a { display: block; float: right; padding: 16px 20px; text-decoration: none; } form .actions a:hover { text-decoration: underline; } - Click Approve and Back.
Create cMVC Views
We will create a few cMVC Views:
- Layout - Display overall UI, which will "wrap" around the contents of other views.
- List - Display a list of upcoming events.
- Details - Display details about an event followed by a registration form.
- Form - Display a simple form.
- Message - Display a simple page title and message.
Create Layout View
- In the Collection Toolbar, click the new menu () and select "cMVC View".
- Enter the Filename:
views/layout.php - Enter the code:
<!DOCTYPE html> <html> <head> <title>Events</title> <link rel="stylesheet" href="<?= $base_url ?>css/web.css" /> </head> <body> <header> <h1><a href="<?= $base_url ?>">Events</a></h1> <div class="profile"> <?php if($user): ?> <a href="<?= $base_url ?>user/signout" title="<?= $user->Username ?>">Sign Out</a> <?php else: ?> <a href="<?= $base_url ?>user/signup">Sign Up</a> | <a href="<?= $base_url ?>user/signin">Sign In</a> <?php endif; ?> </div> </header> <section> <?= $content ?> </section> </body> </html> - Click Approve and Back.
Create List View
- In the Collection Toolbar, click the new menu () and select "cMVC View".
- Enter the Filename:
views/list.php - Enter the code:
<h2>Upcoming Events</h2> <ol class="event-list"> <?php foreach($events as $event): ?> <li<?= $event->Reg ? ' class="registered"' : '' ?>> <a href="<?= $base_url ?>events/details/<?= $event->OID ?>"> <div class="title"><?= $event->Title ?></div> <div class="date"><?= date('l, F j, Y', strtotime($event->Date)) ?></div> </a> </li> <?php endforeach; ?> </ol> - Click Approve and Back.
Create Details View
- In the Collection Toolbar, click the new menu () and select "cMVC View".
- Enter the Filename:
views/details.php - Enter the code:
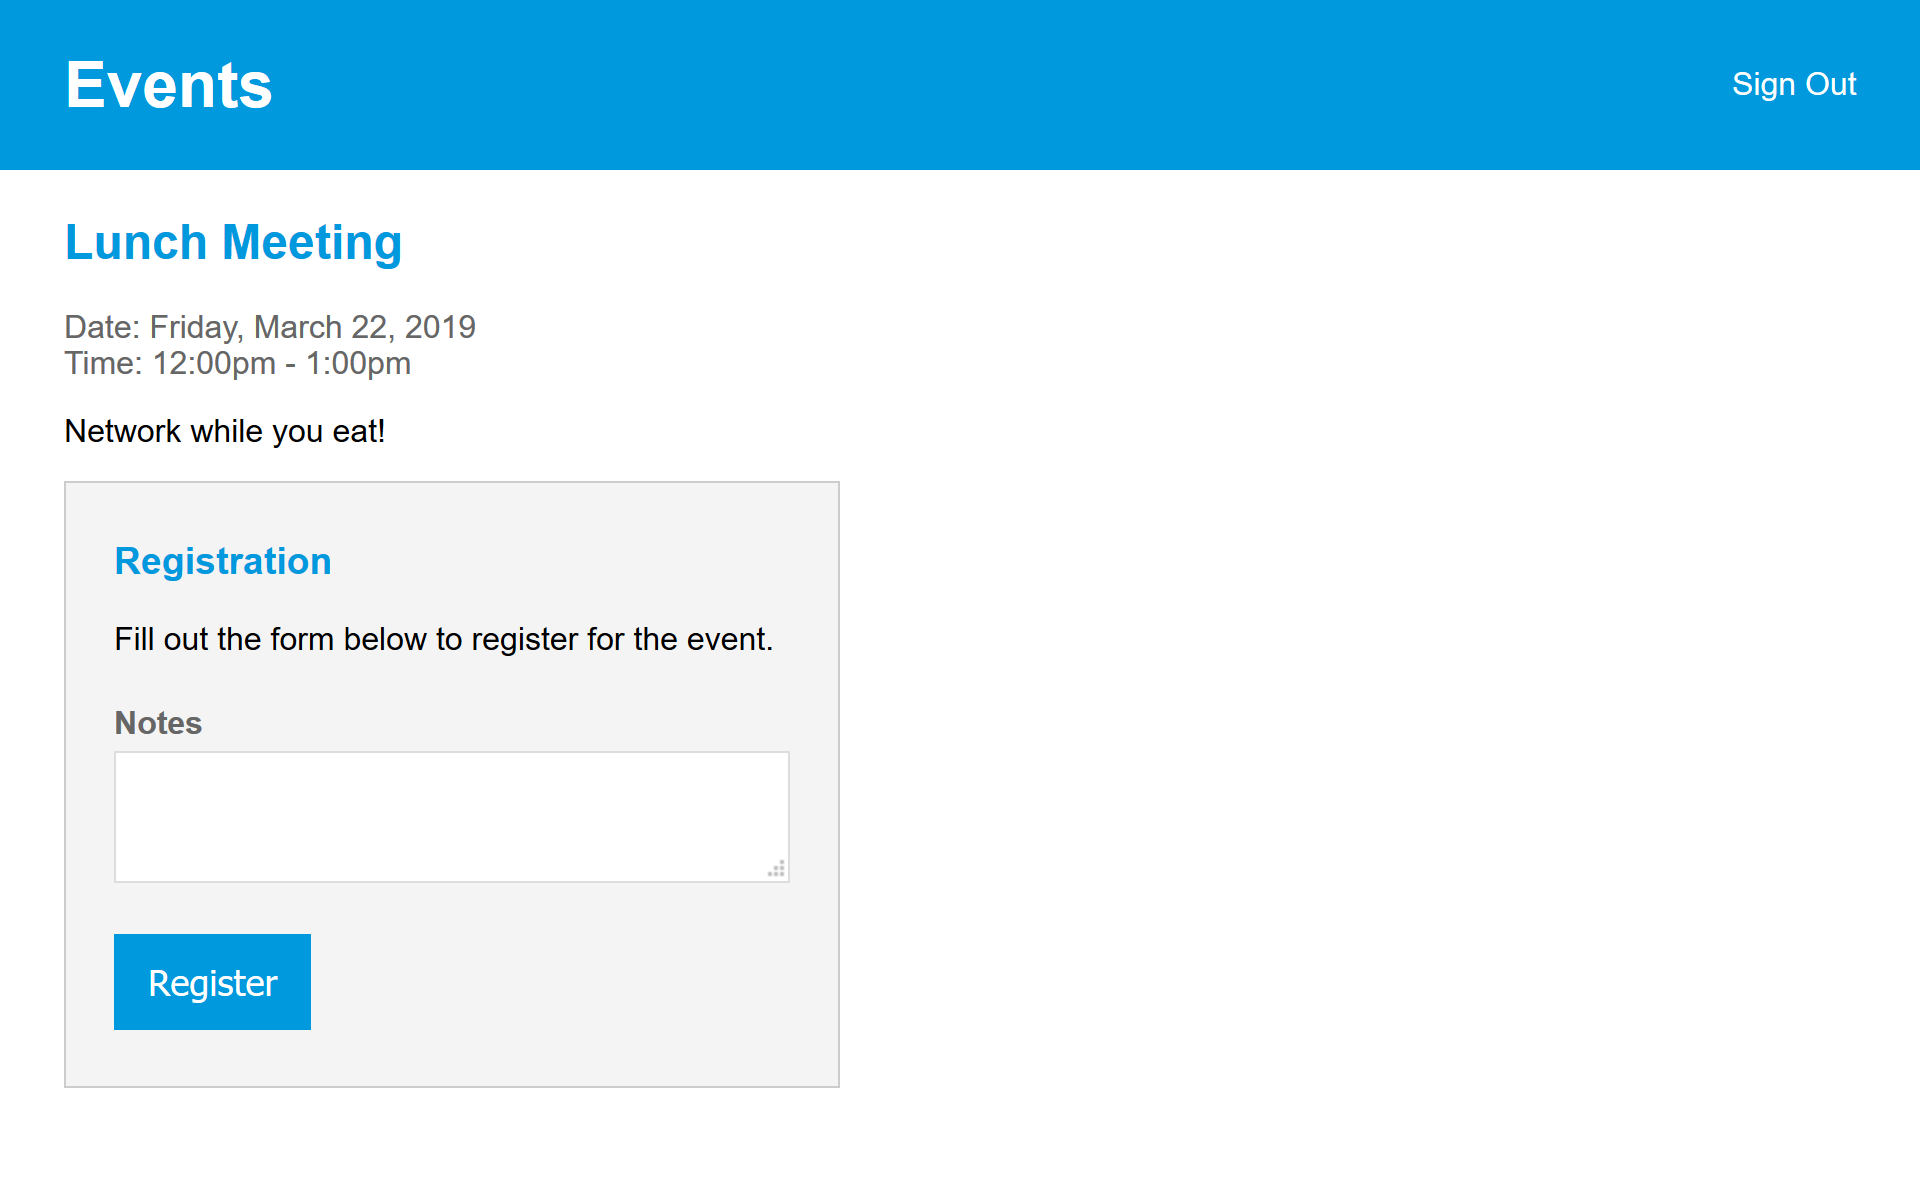
<h2><?= $event->Title ?></h2> <div class="date">Date: <?= date('l, F j, Y', strtotime($event->Date)) ?></div> <div class="time">Time: <?= date('g:ia', strtotime($event->StartTime)) ?> - <?= date('g:ia', strtotime($event->EndTime)) ?></div> <?= $event->Description ?> <?php if($user): ?> <form method="POST" action="<?= $base_url ?>events/register"> <h3>Registration</h3> <?php if($reg): ?> <p>You can update or cancel your registration below.</p> <?php else: ?> <p>Fill out the form below to register for the event.</p> <?php endif; ?> <?php if($message ?? FALSE): ?> <div class="message"> <?= $message ?> </div> <?php endif; ?> <input type="hidden" name="OID" value="<?= $event->OID ?>" /> <input type="hidden" name="reg_oid" value="<?= ($reg ?? FALSE) ? $reg->OID : '' ?>" /> <div class="field"> <label>Notes</label> <textarea name="Notes"><?= ($reg ?? FALSE) ? $reg->Notes : '' ?></textarea> </div> <div class="actions"> <?php if($reg): ?> <input type="submit" name="action" value="Update" /> <input type="submit" name="action" value="Unregister" /> <?php else: ?> <input type="submit" name="action" value="Register" /> <?php endif; ?> </div> </form> <?php else: ?> <h3>Register</h3> <p>To register for this event, please <a href="<?= $base_url ?>user/signup">Sign Up</a> or <a href="<?= $base_url ?>user/signin">Sign In</a>.</p> <?php endif; ?> - Click Approve and Back.
Create Form View
- In the Collection Toolbar, click the new menu () and select "cMVC View".
- Enter the Filename:
views/form.php - Enter the code:
<h2><?= $title ?></h2> <form method="POST" action="<?= $base_url ?><?= $url ?>"> <?php if($form_title ?? FALSE): ?> <h3><?= $form_title ?></h3> <?php endif; ?> <?php if($form_text ?? FALSE): ?> <p><?= $form_text ?></p> <?php endif; ?> <?php if($message ?? FALSE): ?> <div class="message"> <?= $message ?> </div> <?php endif; ?> <?php if($note ?? FALSE): ?> <div class="note"> <?= $note ?> </div> <?php endif; ?> <?php foreach($fields as $field): ?> <?php if(isset($field['type']) && $field['type'] == 'hidden'): ?> <input type="hidden" name="<?= $field['name'] ?>" value="<?= $field['value'] ?? '' ?>" /> <?php else: ?> <div class="field"> <?php if($field['title'] ?? FALSE): ?> <label><?= $field['title'] ?></label> <?php endif; ?> <input type="<?= $field['type'] ?? 'text' ?>" name="<?= $field['name'] ?>" value="<?= $field['value'] ?? '' ?>" <?= ($field['autofocus'] ?? FALSE) ? ' autofocus="autofocus"' : '' ?> /> </div> <?php endif; ?> <?php endforeach; ?> <div class="actions"> <input type="submit" name="action" value="<?= $action ?>" /> <?php if($link ?? FALSE && $link['url'] ?? FALSE && $link['text'] ?? FALSE): ?> <a href="<?= $base_url ?><?= $link['url'] ?>"><?= $link['text'] ?></a> <?php endif; ?> </div> </form> - Click Approve and Back.
Create Message View
- In the Collection Toolbar, click the new menu () and select "cMVC View".
- Enter the Filename:
views/message.php - Enter the code:
<h2><?= $title ?></h2> <p><?= $message ?></p> - Click Approve and Back.
Test the web page
Before we make our new web app available to the public, we can test it out at the URL:
https://<account>.webcomand.com/com_webcomand_example_events/
Debugging
If the web app does not work as expected, you can typically find corresponding errors in the web server error log. To access the web server error log:
- Launch the Files app.
- On the left, expand and click: logs / <account>.webcomand.com
- The open the file with a filename like: <account>.webcomand.com-ssl-error_<YYMMDD>.log
Create Route Settings
Now that everything is working properly, we can make it available from a custom hostname like:
https://events.yourdomain.com/
- In the Collection Toolbar, click the new menu () and select "Route Settings".
- Enter the Title: Events
- Click the "Web" tab and then new (
 ) in the Web Routing field.
 - Enter the desired hostname, such as "events.example.webcomand.com". You should have administrative access to DNS for the domain.
- Select the "Event Registration" package we created for the Default Package.
- Check "Trusted Packages Only"
- Click Approve
- Create a DNS CNAME record for the hostname entered in step 4 above, which resolves to the hostname of your webCOMAND account (ie. <account>.webcomand.com).